I've been trying to use up my pesky scraps of scrappin paper and cardstock. I've tried the note card and gift tag approach. I've tried using them as "embellishments".
So I was curious...what does everyone else do with their scraps?
Thursday, January 31, 2008
Creations of last night
Here are some cards I made last night.
One baby card and the rest for birthdays.
 It says make a wish on the inside.
  I held 4 small stamps together to get t he alignment right
for the 4 stamps mounted on red here.
 Punched out the stripe and glued the punch-outs on anyway!

 The "Welcome Little One" circle is on a dimentional to give it the popped out look.
Enjoy!
Question......
I have found that when stamping, sometimes my stamps come out crooked or uneven. This is especially vexing when I am using word stamps.
Any suggestions on how to keep the stamps straight.
Any suggestions on how to keep the stamps straight.
Baby Cards
I made some more cards for baby showers (a lot of women in our church are having babies soon).


More Cards to enjoy...hopefully!


 The text here says "smile". The daisies are made from two flowers (made with a paper punch) layered together with a regular paper punch in yellow for the center.
The black dots are just from a regular paper punch. I hand drew and colored the ladybug, then cut it out, and mounted in thick cardboard to get the "3-D" effect. I hand wrote "Ladybug Picnic".


 The center daisy on this one was made by cutting out two handdrawn flower shapes and layering them, and centering with a hand cut yellow circle. You can see it opened below.

 The flowers in the corner are cut out from the background paper, and then mounted on cardboard for the "3-D" effect.
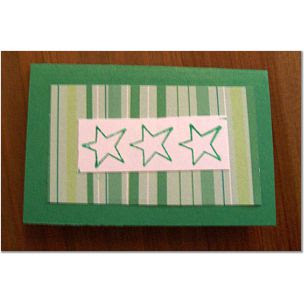
Project Keepsake -- Take Two
I finished another keepsake card for a woman in our church who's husband is deployed to Iraq. Just in case you can't tell from the photos, the base cardstock is navy blue.
 The stars are dry embossed.
 Card opened.
 Fold out front side.
 Fold Out Back Side
 Embellishments I included in her kit, just some tags, and a lined writing block.
 The stars are dry embossed.
 Card opened.
 Fold out front side.
 Fold Out Back Side
 Embellishments I included in her kit, just some tags, and a lined writing block.
Note Cards
I made up some more note cards. I am planning on using them to give with cookies and other items for friends and women I visit with from church. I like the smaller size.


 The text on this one says "wishes". The daisies in the corners are two little white flowers (made with a paper punch), which are layered. I used a regular paper punch to make the yellow center.
 The text on this one says "celebrate".


 The text on this one says "wishes". The daisies in the corners are two little white flowers (made with a paper punch), which are layered. I used a regular paper punch to make the yellow center.
 The text on this one says "celebrate".
Gift tags...
In another effort to use up some more of those nagging scraps, I made some little gift tags for some upcoming events. They look kind of sad, since they are just scraps. Sorry they are so blurry, but I'm a horrible photographer (even with a point and click).


Wednesday, January 30, 2008
Amber's Christmas Card

My friend, Amber, makes the most fabulous cards for Christmas every year. She doesn't have internet access at the moment, so I am posting this for her. Isn't she talented?
Nice Card Blog
http://watercoloreddreams.blogspot.com/ Just wanted to share the blog I found last night. I like her simple cards.
Help!!!
I've been asked to teach a cardmaking class for our church. Any suggestions or ideas?
Also, I need to figure out costs. I was thinking of having people make a dozen cards, but I'm not sure what the costs should be, since I would have to provide all materials (no craft stores here, so I'll have to order on-line).
Also, suggestions on where to order the supplies would be appreciated.
Thanks,
Sandra
Tuesday, January 29, 2008
Card Posting Ettiquitte
I wanted to ask what appropriate card posting ettiquitte would be. I've been making a lot of cards lately, and I'd love to share them, but don't want to hog all the blog space, or make everyone look at my crappy designs.
So, I'm looking for suggestions on how to approach posting my creations.
So, I'm looking for suggestions on how to approach posting my creations.
Stamp Cleaning
Okay, so I ran out of stamp cleaner, and there are no craft stores out here in Germany. Any suggestions on a quick and easy alternative for now (until I can order some online)?
Thanks!
Thanks!
Stampin up workshop
You all are invited to my party!
If you didnt get the email or deleted it somehow:
Bring a friend Recieve a free gift!
Time: Satuday, February 16, 1-4pm
Place: Bri's apartment
RSVP: to me by February 13 (or comment on this post by then)
Fee:$10 for 5 projects ($5 rebate on $30+ orders)
Where you can get LOADS of crafty card ideas!
Flower Birthday Card
Talk about easy. I just wish I had a tag-punch. I cut the tag myself, used twine instead of ribbon, and used the same flower paper I used for the last card I posted.

By the way - thanks to all the new contributors! It's so fun to see a variety of cards. Especially since a lot of us have the same style, since we make cards together. :)

By the way - thanks to all the new contributors! It's so fun to see a variety of cards. Especially since a lot of us have the same style, since we make cards together. :)
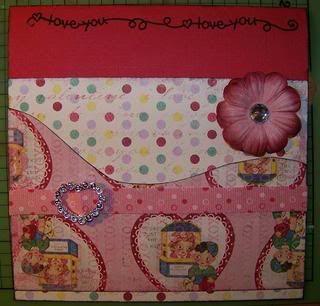
Simple Valentine Card
Hi everyone!!! I wanted to start by thanking Jules for inviting me here to post cards!!!
I like to KISS when I make cards - Keep It Simple Silly!!! The more complex I start to make a card the worse it turns out and then I just don't like it!!!
Here is a recent Valentine card I made for my darling hubby!!!
Want to make a similar card? Follow these simple steps:
Materials Needed (products I used in parentheses):
1 Solid Cardstock (Bazzill)
2 Patterned Papers (Daisy D's)
1 Coordinating Ribbon (misc from stash)
1 Ribbon Slide/Buckle (Paper Studio)
1 Flower w/gemstone center or 1 brad/gem to add to flower once placed (Lil'Davis Designs)
1 Stamp or Pen to add sentiment (Hero Arts)
1 Coordinating Ink Pad (Colorbox)
Let's get started:
1. Create the card base from a 6X12 sheet of sturdy cardstock & fold in half. Ink the edges of the front of the card base. If you want a sharp crease use a bone folder or round pen to smooth out the fold.
2. Cut your base pattern paper 6X4, ink the edges and adhere to the card front.
3. Cut your top layer of patterned paper 6X3 and then on the back draw a wave then cut along the line. Ink the edges.
4. Cut the coordinating ribbon of your choice 7 inches long.
5. Put your ribbon slide/buckle onto the ribbon.
6. Place the ribbon on the top layer of patterned centering it where 1/2 an inch hangs over each side. Once you have figured out exactly where you want it adhere it to the paper and wrap the ends around to the back and adhere them as well. Putting the ribbon on like this will keep you from having frayed ends after the card is handled - you can opt to have frayed ends as extra texture to the card if you like.
7. Adhere the top layer of patterned paper.
8. Place your flower on the front of your card where you have the lowest part of your "wave" on the top layer of patterned paper. If your flower doesn't have a gem in it you can use the brad or gem listed above to place in it before you adhere it to your card.
9. Stamp, handwrite or doodle your sentiment along the top edge of the card.
Voila!!! You've just made a simple but beautiful card!!! If you use this to make cards please link them back here in a comment - I'd love to see them!!!
I like to KISS when I make cards - Keep It Simple Silly!!! The more complex I start to make a card the worse it turns out and then I just don't like it!!!
Here is a recent Valentine card I made for my darling hubby!!!

Want to make a similar card? Follow these simple steps:
Materials Needed (products I used in parentheses):
1 Solid Cardstock (Bazzill)
2 Patterned Papers (Daisy D's)
1 Coordinating Ribbon (misc from stash)
1 Ribbon Slide/Buckle (Paper Studio)
1 Flower w/gemstone center or 1 brad/gem to add to flower once placed (Lil'Davis Designs)
1 Stamp or Pen to add sentiment (Hero Arts)
1 Coordinating Ink Pad (Colorbox)
Let's get started:
1. Create the card base from a 6X12 sheet of sturdy cardstock & fold in half. Ink the edges of the front of the card base. If you want a sharp crease use a bone folder or round pen to smooth out the fold.
2. Cut your base pattern paper 6X4, ink the edges and adhere to the card front.
3. Cut your top layer of patterned paper 6X3 and then on the back draw a wave then cut along the line. Ink the edges.
4. Cut the coordinating ribbon of your choice 7 inches long.
5. Put your ribbon slide/buckle onto the ribbon.
6. Place the ribbon on the top layer of patterned centering it where 1/2 an inch hangs over each side. Once you have figured out exactly where you want it adhere it to the paper and wrap the ends around to the back and adhere them as well. Putting the ribbon on like this will keep you from having frayed ends after the card is handled - you can opt to have frayed ends as extra texture to the card if you like.
7. Adhere the top layer of patterned paper.
8. Place your flower on the front of your card where you have the lowest part of your "wave" on the top layer of patterned paper. If your flower doesn't have a gem in it you can use the brad or gem listed above to place in it before you adhere it to your card.
9. Stamp, handwrite or doodle your sentiment along the top edge of the card.
Voila!!! You've just made a simple but beautiful card!!! If you use this to make cards please link them back here in a comment - I'd love to see them!!!
Love the Bugs....
So I saw this really cute dragonfly stamp on line, and I loved it, but I couldn't wait to buy it to use the dragonfly idea, so I tried to hand draw a similar design. I drew several large and small versions, and used them in various designs. I used a sharpie to draw the outline, and then colored in with crayon.
 I used a word stamp on this one and just tiled it across the bottom.

 I really like the bi-fold idea, especially with the inset overlapping, this is just another experiment in that motif. I also tried to brush the edges of the inset on the stamp pad.
 On this one, I cut out the little dragonflies and mounted them. I wanted a 3-D effect (like Jules's flower card), but I don't have any mounting pads, so I hole punched out some pieces of thick cardboard, and used them as mounts (just glued them on the back of the cutouts).

 This one is also a bi-fold, but I went with ribbon as an opener instead of an overlapping inset.
I also had these really cute bee stickers, but for the longest time haven't been able to figure out what to do with them. I hand drew the "beehives" (not sure if they look right or not), and then cut them out and mounted them on the card. I had to hand draw the wording, so it is not very good.


 I used a word stamp on this one and just tiled it across the bottom.
 I really like the bi-fold idea, especially with the inset overlapping, this is just another experiment in that motif. I also tried to brush the edges of the inset on the stamp pad.
 On this one, I cut out the little dragonflies and mounted them. I wanted a 3-D effect (like Jules's flower card), but I don't have any mounting pads, so I hole punched out some pieces of thick cardboard, and used them as mounts (just glued them on the back of the cutouts).
 This one is also a bi-fold, but I went with ribbon as an opener instead of an overlapping inset.
I also had these really cute bee stickers, but for the longest time haven't been able to figure out what to do with them. I hand drew the "beehives" (not sure if they look right or not), and then cut them out and mounted them on the card. I had to hand draw the wording, so it is not very good.


Subscribe to:
Posts (Atom)